Speedy EV3 Project Upgrade to Spike Prime

Introduction


In this tutorial, we will provide you a Step-by-Step guideline on how you can quickly convert any EV3 project to Spike Prime.  This will be extremely useful for educators who had lots of existing curriculum for the EV3 system, and is concerned about not having enough time to convert all the projects to Spike Prime for the LEGO system upgrade. In this example, we will show the conversation step by step. We will first download the EV3 Classroom and proceed to build the EV3 robot. Then we will show you how to build a mounting point compatible Robot Inventor Hub which will replace the EV3 hub. Finally, we will show you the differences between the EV3 program and the new LEGO word block program.


Download the EV3 Classroom LEGO® Education and Building the EV3 robot

For Windows you can download the application from the windows store.

Or if you prefer to download the installer or use a Mac, you can follow this link and pick the OS you need:
https://education.lego.com/en-us/downloads/mindstorms-ev3/software#downloads

Building your LEGO Robot


Follow instructions on the LEGO Classroom app ….. The build instruction is available from the program we just downloaded.


The project we have chosen is the “Colors and Lines”. The build instruction can be found from the EV3 Classroom LEGO Education application. You have to first build the base robot and then add the color sensor extension. To build the base robot;  open the program and select “Go To Home” -> “Unit Plan” -> “Robot Trainer” and then scroll down to “Moves and Turns”. This is the base robot for the line follower.


Once that is completed, please continue with building “Robot Trainer” -> “Colors and Lines”. The follow 2 pictures show the front page of the building instruction.


Converting your EV3 Construction Project to Spike Prime


Step 0.  Make sure you are using the Scratch based for Word Block programming.


If you have not, please upgrade your code to that on the EV3 platform first.


Step 1a. Getting the New Hub Ready — Make your Spike Prime hub size-compatible with EV3.


You only have to do this step once for all projects.


As the Spike Prime / Robot Inventor hub has different mounting holes and is considerably smaller than the EV3 hub, we have to add side pieces to the Spike Prime / Robot Inventor hub to make it compatible. Please see the video below for the details.

Step 1b. Getting the New Hub Ready — Building the QikEasy Adapter backpack for the new hub.


Depending on the number of EV3 sensors and motors, you will need the same number of QikEasy Adapter boards.  Note that with power limitation on the SP hub, we only support up to 3 QikEasy Adapters for one hub. Again, the backpack can be reused in other  conversion projects and will make it much easier to manage the connections. We are using port A B and C for the Spike Prime / Robot Inventor hubs for the connections. Connection A is used for the color Sensor and is connection to the top Adapter of the backpack. We choose connection B and C simply because they are the next 2 available. All the EV3 connection points are faced towards one side so that they are not obstructed after the backpack is hang to back of the hub. It would be ideal if we can find a half height (4mm) spacer between the top and the 2nd layer adapter. Unfortunately we don’t have that part handy so we will have to adjust the space. For extra security, a five length bar can be added to the back pack for support.


If you want to use more than 3 adapters, you will have to limit the number of adapters connected to the hub when it is booting up powering up. The extra adapters can be connected to the hub one by one after it has successfully booted up. We can only support 3 adapters booting up because of the hub’s build in electrical current limiter.

Step 2. Remove the EV3 Hub


Please unplug the EV3 connecting cables from the robots; the 2 side bars are removed from the EV3 robot. The EV3 hub can be simply pulled upward and removed form the robot.

Step 3. Drop in the Spike Prime / Robot Inventor hub with the QikEasy backpack


The Qikeasy Adapter backpack can be attached to the power button side of the Spike Prime / Robot Inventor Hub. Once that is done, you can simply connect the colour sensor to the top connection point and the 2 motor cable to the QikEasy Connectors. Please note the the direction for connection the one of the motor is upside down.


You can review the video on the top of this page to check out the connections.

Step 4. Converting the Word Block Program


The are 2 reason for modifying the programs. Missing reflection calibration word block and motor configuration.


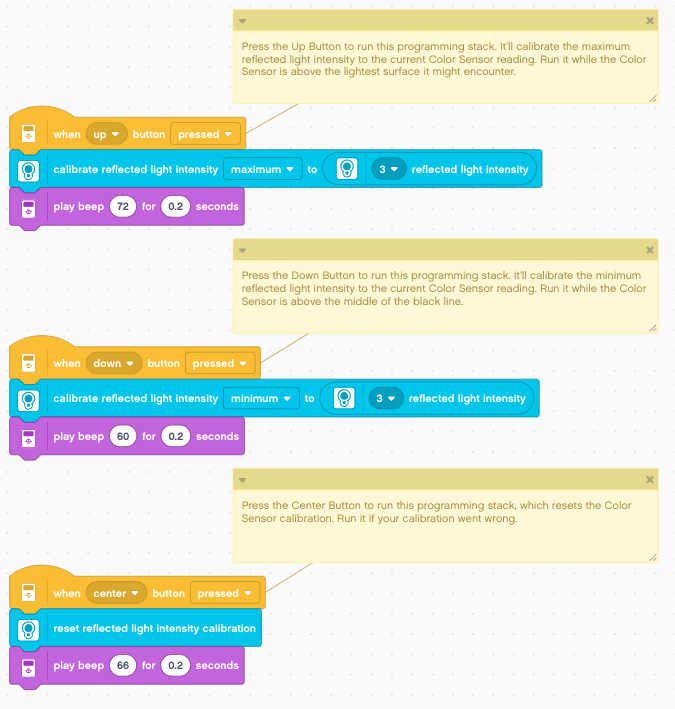
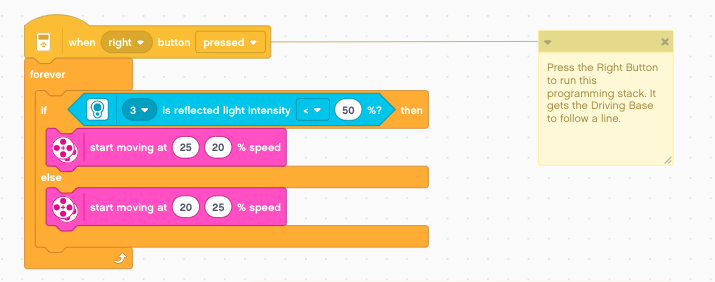
The legacy EV3 word block program relies on percentage reflection to determine if the robot is off track. Before the robot can work reliably, the maximum and minimum must be established by using the build-in calibration word blocks. The following word block code is captured from the EV3 line follower program.


Once the calibration is done, the main program of the line follower is captured below for reference. Please note that it is very important for the following program to have an accurate calibration. If the calibration is not done properly and the value returned is biased, the robot will not function.


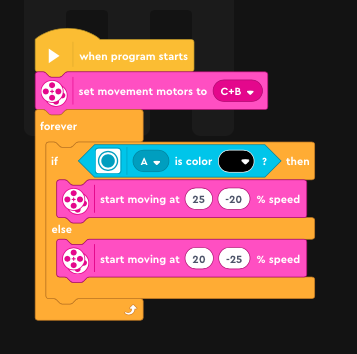
As mentioned earlier, the reflection calibration word block is no longer available from the Spike Prime / Robot Inventor; therefore, we will have to change the programming approach. We will therefore reference the now Spike Prime / Robot Inventor line follower approach to use colour detection.  The new code relies on colour detection instead of percentage reflection. It is much cleaner because it does not have any calibration related code. Please see the capture below for reference.


The new word block code simple turns the robot based on the color received instead of reflection.


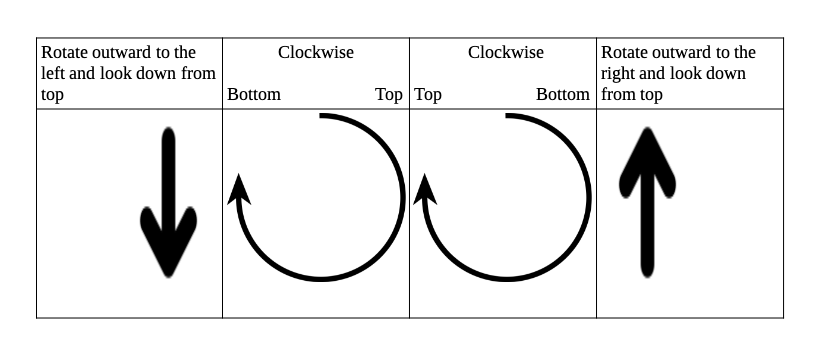
The 2nd change is the fact that the 2nd movement percentage speed is now a negative number. Let me explain the reason behind the negative sign. Imagine you put two motor side by side and both of them has a rotating wheel on top truing in a clockwise manner; as show in the middle 2 rows of the table below. Now if you turn the 2 motors sideways with the wheel on the side and look at the direction of rotation from above.

As shown in the table below, the 2 wheel will not be moving in sync forward or backward. To compensate for the sideway motor, Lego word blocks has already flipped the director of one of the motors in SP / RI. However, for EV3 motors for this particular robot, if the motors are in same direction, the robot will be moving forward already.

Therefore, in order to compensate for the build-in compensation by Lego, we will have to turn one of the direction of the motor negative, as shown in the word block program above.


Done and Check the results

In conclusion, this EV3 robot can be easily modified to work with the new Spike Prime / Robot Inventor hub. The adaption of the hub to work with EV3 mounting points is in general reusable; so is the backpack. Only the word block programing would need a little bit of adjustment. The end result is shown in the video on the top of this page. We hope this video can inspire others to convert their EV3 robots and revive them back into the Spike Prime / Robot Inventor universe.