Boot QikEasy Adapter into Setup Mode
First of all, to get started in using your QikEasy Adapter as a Virtual Wireless Sensor mode, you must make sure:
- To ensure that your hub won’t turn off by itself in the middle of an update, please connect USB power to your LEGO hub. This USB power may come from your computer’s USB port or any other USB power source.
- No EV3 device is attached to the QikEasy Adapter
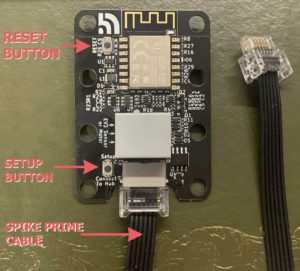
- A Spike Prime cable is attached to QikEasy Adapter’s Spike Prime port
- The other end of the Spike Prime cable shouldn’t be attached to anything yet.
There are 2 ways to boot your QikEasy Adapter into Setup Mode.
A. Using the “Reset Button” (this is the easier procedure to perform)
- Using the Spike Prime cable, attach your QikEasy Adapter to your LEGO hub. i.e. one end of the cable connects the hub, the end connects to the Spike Prime port of the QikEasy Adapter.
- Press and hold the Setup button on your QikEasy adapter.
- Click and immediately release the Reset button
- Keep holding the Setup button until the red LED light on the QikEasy Adapter board starts blinking at a rate of one blink per 4 seconds

B. Unplugging and plugging the Spike Prime cable
- Before connecting your QikEasy Adapter to the hub, Press and hold the Setup button on your QikEasy adapter.
- While holding the Setup button, plug in one end of the Spike Prime cable to your LEGO hub. (The other end of the cable should be connected to the Spike Prime port of the QikEasy Adapter.)
- Keep holding the Setup button until the red LED light on the QikEasy Adapter board starts blinking at a rate of one blink per 4 seconds.
- Release the Setup button.
The slow blinking LED confirms that your QikEasy Adapter board is in Setup mode. If you don’t see the LED blinking slowly, you will need to try the procedure again.
Connect your computer or mobile phone to the Adapter’s Setup Mode Wifi Access Point
- On your computer or mobile phone, open the OS configuration screen for connecting to your local wireless network.
- On the list of Wifi networks available for your computer to connect, you should see a Network name: “QikEasyAdapter_<chip Id>”, where the chip ID is the number appearing on the first row of the label attached to the back of your QikEasy Adapter.
- When prompted to login to the Adapter’s Wifi network, enter the following as the password:
- 12345678
TIP: Sometimes if your surroundings is congested with many other Wifi routers, your computer may have difficulty connecting to the QikEasy Adapter Access Point. In such case, it would be useful to try reset and boot in into Setup mode again, because the QikEasy Adapter switches to a different Wifi channel (between channels 0, 1, 6 and 11) every time it reboots.
Open your browser to the QikEasy Adapter Setup page
On the computer/mobile phone that is connected to the QikEasy Adapter Setup Mode Wifi Access Point:
- Open a browser
- Enter the address “http://192.168.3.1”
- The browser should open a Setup page similar to this:

- Supported Browsers:
- Chrome (on PC, Mac, iPhone, and Android)
- FireFox (on PC, Mac, iPhone, and Android)
- Edge (on PC)
- Not Supported:
- Safari on Mac are known to have problems
- Supported Browsers:
TIPS:
- If you simply enter “192.168.3.1”, some browser may default the URL protocol to “https://”. But in our case, we only want “http://”. That’s why you should enter the full address as above.
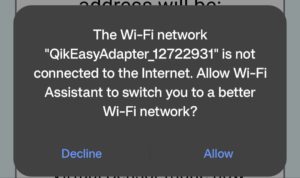
- On some device, you may see a message indicating that it is unable to connect to the Internet. In most cases, you can safely ignore this message and click “Decline” to continue.


